- This post contains affiliate links. Read more here.
- Not a substitute for professional veterinary help.
Whether you’re a lifelong cat parent or a first-timer, it’s important to understand the basics of how to groom a cat. While cats are fastidiously clean animals, expecting them to do all the work and ignoring your kitty’s feline hygiene needs can actually lead to a lower quality of life.
In this guide to how to groom a cat at home, we’ll walk you through what you need to know about caring for your cat’s hair, nails, teeth, and ears. We talked with experts like Christiana Spurlock, a Certified Feline Master Groomer and owner of Classy Claws Mobile Grooming, as well as Sarah Wendling, a fear-free certified groomer and the owner of Toronto-based Cleopawtra Cat Services.

How Often Should You Bathe a Cat?
Unless your cat has a condition that requires more frequent bathing or gets especially dirty, Spurlock and Wendling recommend bathing your cat once every three months. Long-haired and curly-haired cats may need baths once per month, and hairless cats need weekly baths.
According to Spurlock, regular baths are a good preventative and proactive measure. Not only can it help you detect health issues, but it can desensitize your cat to being washed. “When your cat goes through life without being handled and familiar with being groomed, when an emergency happens it is an extremely stressful time for your cat,” Spurlock explains.
| Example Breeds | Bathing Frequency | Care Considerations | |
| Short Hair | Abyssinian, Bengal, Russian Blue, Bombay | Once every three months | Though they’re less likely to mat, regular brushing is essential for short-haired cats to remove loose hairs, prevent hairballs, and distribute healthy oils. |
| Long Hair | Persian, Maine Coon, Turkish Angora | Once a month | They may be prone to matting and tangles. Using a metal comb (rather than a brush) can help remove knots. |
| Curly Hair | LaPerm, Selkirk Rex, Devon Rex | Once a month | Curly hair can be susceptible to skin conditions like dryness and dandruff and may need regular moisturizing. |
| Hairless | Syphx, Peterbald, Donskoy | Weekly | Because their skin is in direct contact with surfaces, they may be prone to acne. Their ears may need more attention, too, as they tend to accumulate wax and debris. |
| Kittens | NA | No baths before 2 months old | Kittens need to be bathed gently and dried quickly to warm them up. |
According to Dr. Heather Timmermans, Lead Veterinarian at CityVet Richardson, you might need to bathe your cat more frequently if:
- Your cat got into something sticky, smelly, or toxic
- Your cat has mobility issues, such as arthritis
- Your cat is incontinent or has bladder or bowel disorders
- Your cat is overweight or obese
- Your cat has a metabolic disease like thyroid dysfunction
- Your cat has exceptionally long fur or is hairless
How to give a cat a bath
To give your cat a bath, choose a safe space your kitten can’t bolt from, like a bathroom with a door or a secure kitchen sink. If your cat is especially skittish or anxious, consider recruiting a helper to feed treats. Don’t force a struggling cat into a tub.
- Fill the tub or sink with warm but not hot water, and get your kitty wet.
- Gently massage a cat-formulated shampoo into their fur from nose to tail, avoiding sensitive areas like eyes and ears.
- Reward regularly with high-value kitty treats and squeezable pastes.
- Then rinse your cat thoroughly with clean warm water.
- Once all the soap is gone, dry your kitty with a soft, absorbent towel.
If you run into snags—like mats or sores—it’s best to go to your vet or a groomer for help. Make sure you avoid using human soaps—even baby soaps or detergent. They’re the wrong pH. And for little messes that don’t warrant a full bath, get out the cat grooming wipes instead.

Natalia Kokhanova via iStock
How Often Should You Brush a Cat?
Brushing your cat is important to keep their coat and skin healthy. Your cat’s hair type determines how often they need to be brushed. Spurlock and Wendling recommend once a week for short-haired cats and daily for long-haired cats.
| Brushing Frequency | |
| Short Hair | At least once a week, up to three times a week for particularly thick or plush coats |
| Long Hair | Daily to avoid tangles and matting |
| Curly Hair | Once or twice a week |
| Hairless | No brushing required; bathe once a week |
| Kittens | Every other day for kittens younger than six months to get them used to the process |
How to brush a cat
To brush your cat, choose a calm moment, then gently set your cat in your lap or place your forearm under their front legs.
For short-haired cats, use a slicker brush, rubber curry brush, or grooming glove. Brush gently in the direction of hair growth to remove loose hair, dirt, and debris.
For long-haired cats, Spurlock advises cat caregivers to focus on “high friction areas like the belly, armpits, and between the back legs.” Wendling recommends using a metal comb to gently work out mats. Stubborn mats may require a mat splitter or professional groomer. Avoid using scissors to remove mats, as you risk cutting your cat’s skin.
To maintain a curly coat for curly haired cats, use a soft brush or grooming glove that doesn’t disrupt the natural curl pattern.
Keep sessions short (under five minutes) and have lots of treats handy. Wendling emphasizes the importance of giving cats the freedom to move and take breaks if they need them. “Work with your cat, not against them,” she advises, adding that if your cat walks away, you should let them. “If you don’t brush every spot on your cat every day, that’s okay.”
-

anastas_ via iStock

How Often Should You Cut Your Cat’s Nails?
Most cats need their nails trimmed at some point, but how much and how often depends on the individual cat and their household.
“Different cats will grow their nails more quickly than others, and some will scratch more and keep them shorter. If your cat’s nails are clicking on the floor, or worse, growing into their pads, they are in need of a good mani-pedi,” Dr. Timmermans says.
Cutting your cat’s nails every 2 to 4 weeks helps keep your kitty’s paws healthy, prevents accidents, and protects your furniture.
How to trim cat nails
To cut your cat’s nails, position them in your lap and gently press their paw until their claws extend. Hold the clippers at a 45-degree angle to the nail, then carefully snip just the tip of the nail. Repeat this for each nail.
Don’t use dog, human, or baby nail clippers on your cat, since cat nails are easy to break, crack, or split. It’s best to use cat-designed scissors-style clippers because their curved angle allows you to snip the tips of your cat’s claws without cutting into the sensitive quick.
Keep the experience positive. “Never force your cat to endure a nail trim. Sometimes this means you may only be able to trim one nail at a time, and that’s okay!” Alvey says. She also recommends recruiting a partner to actively offer treats during the process.
How To Care for Your Cat’s Ears
“Cats rarely need to have assistance cleaning their ears. Most of them have upright ear pinnas that allow good airflow,” Dr. Timmermans says. “You rarely see a cat swimming and dunking their heads underwater like the typical Labrador with chronic ear infections.”
If you notice unusual behaviors like your cat scratching or pawing at their ears or tilting and shaking their head, gently peek into their ears.
If you see redness, inflammation, or any kind of gunk in their ears, make an appointment with your vet. Your vet can diagnose if your cat has an ear infection or problems like excess wax buildup, ear mites, or any debris or foreign objects stuck in there.
Resist using a hand, toileting, or disinfectant wipes to clean it. Many of the ingredients in these products are dangerous or even toxic for cats. Alcohol especially can seriously irritate sensitive cat ears.
If your vet determines you should clean out your cat’s ears, they’ll prescribe or recommend an ear cleaner, such as antifungal, antibacterial, or antimicrobial cat-formulated wipes or liquids. They’ll also demonstrate safe, effective, and low-stress ways to clean your cat’s ears.
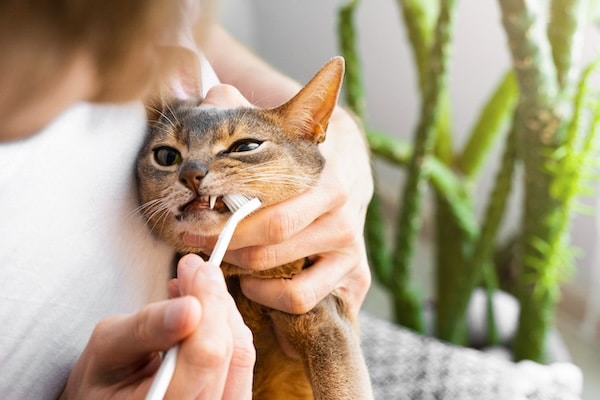
How To Care for Your Cat’s Teeth
Between 50% and 90% of cats over the age of four have some form of dental disease. To lower your cat’s risk of developing painful gingivitis and periodontal disease, pet parents should aim to regularly brush their cat’s teeth and keep up with their vet appointments.
According to Alvey, it’s best to brush your cat’s teeth every other day, but if you can only get your cat to cooperate two to three times per week, that’s fine.
The best way to get a cat used to toothbrushing is to start slow. First, let your cat sniff the toothpaste on your finger, then sniff the toothbrush, then touch the toothbrush to their mouth. Reward frequently as your cat builds up tolerance, using a technique like “touch, release, treat.”
Once your cat is used to the smells and sensations, you can start brushing.
- Gently push back your cat’s lips to reveal their teeth.
- Pull out a pet-specific toothbrush and add a pea-sized amount of cat toothpaste.
- Using small, circular movements, brush the toothbrush over the outside of your cat’s teeth and gum line.
While you’re brushing, Dr. Timmermans advises cat parents to monitor their kitty’s teeth and gums for redness at the gum line, bad breath, and abnormal looking tooth enamel. Talk with your veterinarian to determine how frequently your cat should have professional dental cleanings.
-

Daria Bulgakova via iStock
When To See a Professional Groomer
While you’ll likely be able to tackle most of your cat’s grooming needs at home, there are some issues—and some fur types—that may require a professional groomer.
For example, long-haired cats might need to got to a groomer for services like sanitary trims. “This involves just removing the fur under a cat’s tail and down their back legs to prevent waste from getting stuck when they use their litter boxes,” Wendling explains.
Long-haired cats may also see a professional groomer for mat removal. If your kitty regularly get mats, they might be signed up for regular trims to keep their hair short.
Spurlock says short-haired and medium-haired cats are great candidates for de-shedding treatments at a groomer, though these are typically optional. Regular trims can also offer a solution for cats with excessive hairballs.
Here’s a closer look at what professional groomers should handle.
| What you can do at home | What can be done at home OR by a professional | What to leave to a professional |
|
|
|
Basic Grooming Gear
To tackle your cat’s grooming routine, you’ll need some basic grooming gear. Your cat grooming kit should contain the following essentials:
- Brushes. Rubber curry brushes and slicker brushes remove dead hair, and a metal comb helps loosen tangles and prevent mats in long-haired cats like Maine Coons.
- Nail clippers. These come in various styles, scissor-style clippers are the best for cat nails.
- Toothbrush. Look for a cat-specific brush for your cat’s tiny mouth. The dual-ended RYERCAT brush is a popular option.
- Toothpaste. Pet-specific formulas like the sorbitol-free PetSmile toothpaste are safe for your feline and appeal to their meat-loving palate.
- Cat shampoo. To avoid irritation, use a product specifically designed for cats’ fur and skin.
- Cat wipes. Ideal for touch-ups and eye cleaning.
What Kind of Grooming Do Kittens Need?
Kittens need the same basic grooming care as adult cats. In fact, practicing the basics of grooming on your kitten helps them get used to the process, making future grooming a less stressful experience for everyone. Extra care, however, is required.
Baths should take place only once your kitten is two months old, since they’re unable to regulate their body temperature. For a kitten under two months, use kitten-safe wipes or a warm damp cloth to clean their body.
To brush your kitten’s fur, use a soft bristle brush, preferably one designed for fluffy kitten hair. You can also start trimming their nails to prepare them for routine nail trimming as adults.
Heather Alvey, Certified Cat Behavior Consultant and owner of Felidae Behavior Consulting, recommends making the process positive and voluntary through what’s known as “cooperative care.” Letting your kitten opt in builds trust. It contributes to a positive association with grooming sessions that your kitten will carry with them through their adulthood.
“Cats prefer to feel in control, so let them take the lead,” Alvey says. “It’s crucial to avoid forcing your cat to engage in these grooming activities, as doing so can create negative associations, making future attempts more difficult.”